


NAM Tutorial for building a simple RHW-4 x RHW-4 interchange

Tutorial for building a simple RHW-4 x RHW-4 diamond interchange (NAM 36)
On a 6 point scale, the construction difficulty of this simple diamond interchange rates as Advanced:
Beginner ► Intermediate ► Advanced ► Difficult ► Sophisticated ► Expert
This is Advanced in terms of road building, but a very excellent starting place in terms of learning the Real Highway (RHW) features of the NAM.
I really should have written this tutorial 12 months ago. This is my most basic RHW-4 x RHW-4 interchange. It's small and discreet; it's fast and efficient. It handles fairly high traffic capacities on all four RHW-4 approaches, which is appropriate for the intersection of two highways. If you follow the steps, it's not hard to build. 
Click on any of the images to zoom, and then use arrow keys to swap between screenshots.

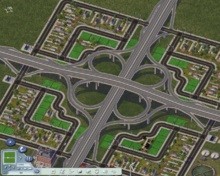
As much as RHW interchanges tend to take up more space than the equivalent MHW interchanges, this little beauty takes up just 12x4 tiles, whereas the vanilla MHW cloverleaf prefab interchange takes up 16x16 tiles (pictured below) ... and both of these interchanges achieve the exact same result.
Quote
If you're new to the NAM, or to RHW, you'll be feeling the learning curve. This tutorial will help you with that. When you're done, you'll have an understanding of construction order, and some of the pieces and elements vital to NAM highway interchange building. ![]()
Ingredients
- Quick Level Brush using Ctrl+Alt+Shift God mode, or your other preferred terrain flattening technique.
- 10x RHW-4 Starter Piece. You might not really need them all, but more is better for stable interchange building.
- RHW-2 tool at the top of the Highways menu.
- 4x FLEXRamp Type A1 (optional).
- 2x four-tile lengths of Maxis One Way Road (OWR-2).
- 4x 1-Level Flexible Height Transition (FlexHT).
- NAM Disconnector tool (optional but exceedingly helpful).
-
Ctrl+X drawpaths as provided by the "Extra Cheats" DLL. Note this is a toolkit DLL, as well as having some cheats in there, too.
https://community.simtropolis.com/files/file/21118-SimCity-4-extra-cheats-plugin/
.jpg.bc54104e2798e1935829933f852858ef.jpg)
Construction Placement
.jpg.06b51d3ac0405c7c1af916f507b863e6.jpg)
- Eight of the ten RHW-4 Starter Pieces on the approaches, with closest possible tile position indicated by purple lines.
- 2x four-tile lengths of Maxis One Way Road indicated by the pastel pink lines.
- Position and orientation of the Type A1 ramps, indicated by the bright blue lines.
- Position of the four 1-Level Flexible Height Transition (FlexHT) pieces shown by the long red lines.
- The last two RHW-4 Starter Pieces snuck away on the inside centre 4 tiles of the interchange. If you look closely you'll see them indicated with a couple little purple blobs.
Construction Order
Construction order is key to building RHW interchanges. Doing things in the wrong order makes it harder, so I've outlined steps below to make it easier. When you're feeling comfortable with the interchange building process, feel free to experiment with variations to the construction order ... it's good to experiment, too! ![]()
- Level the ground - Interchanges in real-life are generally built on level ground, or else the slope poses specific engineering challenges and/or opportunities. In the NAM, you'll make your interchange building much easier if the ground is extremely level, whether that's with terraforming, or 1x1 street plops, or some other method.
- Identify the centre four tiles of your interchange, and use the RHW-2 tool to draw the highway almost to the centre of the interchange, as shown in the Ingredients screenshot above.
- Draw four tiles of OWR-2 running from east-to-west, just one tile north of the centre four tiles. Repeat with another four tiles of OWR-2 running from west-to-east, just one tile south of the centre four tiles.
-
Use the NAM Disconnector tool to make room for plopping eight RHW-4 Starter Pieces, on each of the approaches, the closest possible tile positions shown by the purple lines on the Construction Placement screenshot below.
- 7th tile east and 7th tile west of the centre four tiles.
- 2nd tile north and 2nd tile south of the centre four tiles.
-
Make sure to get the centre yellow line on the inside of the RHW-4,
... and the dark gray shoulder on the outside of the RHW-4,
... using the Home/End keys to very carefully orient each RHW-4 Starter Piece.
- Use the RHW-2 tool to connect the highway up to the eight RHW-4 Starter Pieces.
-
Plop four FLEXRamp Type A1 pieces on the 5th tile east and 5th tile west of the centre four tiles.
- Alternatively you can use a DRI draw with the RHW-2 tool, starting at the 5th tile, to create each Type A1 parallel ramp. Refer to the demonstration of the DRI draw technique by the animated GIF at the bottom of this tutorial.
- Type A1 ramps need at least a one tile gap from any starter pieces.
- Your interchange should now look like the half-constructed screenshot in the Ingredients, and with the placement of the various pieces (so far) as indicated by the Construction Placement screenshot.
-
Use the RHW-2 tool to connect the four Type A1 Ramps to the little stretches of One Way Road (OWR-2), as shown in bright yellow preview in the Ingredients screenshot.
- Whereas OWR-2 must be drawn in the driving direction, the RHW-2 tool can be drawn with right-to-left, or left-to-right.
- RHW driving direction is set by the starter piece, not the drawing direction.
- Plop the four 1-Level Flexible Height Transition (FlexHT) pieces, positioning the brown square in the centre of the interchange, and using Home/End keys to get them into position.
-
Plop the last two RHW-4 Starter Pieces inside the centre of the interchange ... there's just barely enough room.

- These last two starter pieces help stabilise the underpass.
-
Make sure to get the centre yellow line on the inside of the RHW-4,
... and the dark gray shoulder on the outside of the RHW-4,
... using the Home/End keys to very carefully orient each RHW-4 Starter Piece.
- Use the RHW-2 tool to draw north-south, and east-west, to connect up each carriageway.
- Check that the RHW-4 looks right underneath the overpass. If it looks weird, or like it's swapped direction, use the RHW-2 tool to click on various highway tiles nearby until it comes good.
-
Lastly, turn on Ctrl+X drawpaths to really check that all the traffic paths are right,
... and Ctrl+X hidepaths when you're done.
.jpg.b16bc987d4ed685a772db10f61869a06.jpg)
Using DRI draw for highway ramp building
The link below takes you to a "starting out" tutorial on DRI, but even just the animation is pretty clear on how to use DRI to draw Type A1 and Type B1 ramps. So convenient! This is an alternative to clicking through the menus to find the FLEXRamp Type A1 pieces. 

-
 5
5

0 Comments
Recommended Comments
There are no comments to display.
Sign In or register to comment...
To comment in reply, you must be a community member
Sign In
Already have an account? Sign in here.
Sign In NowCreate an Account
Sign up to join our friendly community. It's easy!
Register a New Account