


Contributor/author(s): Wren Weburg, Jerry Farm (for Mac instructions)
Introduction
SimCity 3000's ability to import grayscale bitmaps, which are, in effect, "elevation maps", has given SimMayors more power and flexibility than ever before when it comes to creating their own terrain. This ability to import bitmaps means that SimMayors can now model their SimCities from real world terrain with virtually pinpoint accuracy, thanks to the ability to convert USGS topography maps (or DEMs--Digital Elevation Models) to grayscale bitmaps, which in turn can be read by SimCity 3000 and translated into SimCity 3000 terrain.
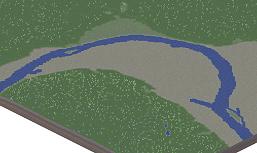
Unfortunately, the process to import DEMs into SimCity 3000 is somewhat complex, and even with a step-by-step procedure, the task can be very demanding on the SimMayor. What this two part article does is go through the procedure step-by-step using an example city--St. Paul, MN. Along the way, it will provide tips and suggestions in hopes that the information can be used as a model for other applications.
In this article, it will be assumed that you have a basic understanding of the process of bitmap importation. If not, see the predecessor of this article, "Generating custom terrain from bitmaps" (Knowledge Tree article #0057). It also assumes that the end user has a paint program and is fairly skilled in using it. In other words, you can crop, rotate, lighten, and darken images with no problem. Also, for the purposes of this article, the program Paint Shop Pro 5 (available as downloadable shareware at http://www.jasc.com) will be used. Most other paint programs will work about the same, but the steps may be a little different.
In addition, this is but one method for importing and editing real world terrain. There are other DEM programs, paint programs, zip programs, and perhaps even other terrain sites to use. By no means does this article cover all of these things, but again--the goal is to give you a general procedure that can be applied to other programs. This article is simply restricted to certain programs and routines because they are tried and true. As more is learned about other methods and programs, this article will be updated (or other articles will complement it). So without further hesitation, let's get terraining!
Step 1: get the DEM to BMP program
Windows
Kahmyong Moon has put together a simple Windows console program (i.e. a DOS-like program) that reads ddf files (DEM files) and translates them into a BMP file. This is the program that we will use for this article.
- Download dem2bmp.zip (42K). If you are reading this article from a printout, the full URL is: <http://www.sc3000.com/archives/dem2bmp.zip>.
- At this point, I will suggest making a terrain directory on your hard drive to store all of your terrain files and such. For this article, I will make my directory on drive C: and call it "terrain".
- Extract the dem2bmp.zip file to your terrain directory. You'll need WinZip (http://www.winzip.com) to extract this file.
Macintosh
-
Download and install MacDEM (thanks to Jeffrey Jakucyk for the link):
http://www.treeswallow.com/macdem/index.html
Okay. Now you have a tool that converts DEM files to BMPs, so the next step is to get a DEM file to convert. After all, what good is a DEM program without DEMs?
Step 2: go and get the terrain
The first thing we have to do is go out and grab the terrain we want. In other words, we have to grab the correct DEM file from the USGS FTP site. As the name suggests, USGS is confined to storing only United States terrain, although you may be able to find similar governmental agencies in other countries that store similar data. The particular DEM files we'll be after are 7.5 minute DEMs. These files use a UTM projection and the data corresponds to approximately 1:25000 scale topographic quadrangles for the US regions. 7.5 minutes is equivalent to 75/600ths of a degree, which is about 5 miles. Coincidentally, SimCity 3000's largest map is 5 miles on a side. What this means is that the scale of these files is almost perfect for SimCity 3000 terrain.
So let's go get that terrain. There are two methods: the easy way and the manual way.
The easy way (US data only; thanks to Jerry Greene for this link!):
- Point your Web browser to http://edcwww.cr.usgs.gov/bin/maptest/coords=55.000000+-130.000000+20.000000+-65.000000/scale=24/type=dem/zoom=8
- Click your mouse on the desired locations on the map of the US. After continuing to zoom in the desired location, you will be presented with a directory listing link.
- Once at the directory listing, download the .tar.gz file and save it to disk. Now skip down to "Uncompressing the .tar.gz file" on this page.
The manual way:
- Point your Web browser to ftp://edcftp.cr.usgs.gov/pub/data/DEM/7.5min/ (if that doesn't work, try this alternate method).
- You should now see a directory listing. This is an alphabetical list of cities by first letter. So for example, the directory called "B" contains all cities in the US that start with the letter B. Click the appropriate letter for the city you're after. For this article, we will choose S because we're looking for Saint Paul, MN.
- The next screen lists all the city directories that start with the letter you chose. The format is [city]_[state] where [state] is a 2-letter state abbreviation. So we must locate the city we're after. In our case, we will choose the directory "saint_paul_east_MN". Depending on the size of the city you choose, you may have to choose east, west, northeast, etc. We could have chosen "saint_paul_west_MN", but I know that I want east because I am well acquainted with St. Paul. It may take a few tries to locate the part of the city you want. For all practical purposes, just pick one. Later on if it turns out to be the wrong part of the city, you can repeat this process until you find the right piece.
- After selecting the city directory we want, we should now see a link to a single file. The format of this file isn't important, but for you techies, it is as follows: [resolution in meters: 10 or 30].[level: 1 to 3].[version number].[unique file ID].tar.gz. Click this file to download it. I suggest saving it to your "terrain" directory. Just don't forget where you save it.
- Since a .tar.gz file won't do us much good, we need to uncompress the file. This process is highlighted below.
Uncompressing the .tar.gz file
- Windows users: if you are unfamiliar with extracting .tar.gz files, you will want to refer to Knowledge Tree article #0148, "Uncompressing tar.gz files". Use that article to get to the point where you can see the contents of the DEM file archive you just downloaded.
- Mac users: the MacDem site provides instructions for extracting tar.gz files and also has links to applications to do the job. The MacDem is, again, at: http://www.treeswallow.com/macdem/index.html.
- Once you can see the content of the DEM archive you downloaded, you will want to extract only one of the files: the file "????CEL0.DDF" where ???? is the unique identifier for the file. This file is usually the largest file. In our case, the file was called "1039cel0.ddf". Extract the cel0.ddf file to your terrain directory. Or you can extract all files but ignore the rest. It's up to you.
Step 3: converting the terrain to bitmap
Now we're going to make use of that DEM2BMP program we set up earlier (or in the case of Mac users, the MacDEM program, although you will have to use this program on your own as I don't have any routines written up on it yet. If you are using MacDEM, skip down to the link at the bottom of this page). The steps below assume that the dem2bmp.exe program is located in the same directory as the .ddf DEM file. If both files aren't in the same directory, just move both into your terrain directory.
Windows users
- Open an MS-DOS prompt window from within Windows. The MS-DOS prompt shortcut is usually located somewhere in your Start menu.
- Navigate to your terrain directory or wherever dem2bmp.exe and your terrain file reside.
-
Once in the correct directory, type:
dem2bmp [DEMfilename.ddf] [BMPfilename.bmp]
and allow several moments for the process to complete. Ignore the scrolling gibberish on your screen. It will eventually stop.
In our example, we would have typed
"dem2bmp 1039cel0.ddf stpaul.bmp". This would create the file stpaul.bmp in our terrain directory. Note that a .tmp file will also be created. You can discard this file after the import routine is done.
Macintosh users
- Open the DEM (.ddf file) with MacDem
- Turn "Lighting" off.
- Change the color map to gray.
- Use the Export PICT option and save the DEM to a PICT file.
- You may need to use a graphic converter to convert the PICT to a BMP file, if SimCity 3000 for Mac requires a BMP file.
You now have a BMP/PICT file suitable for editing. You could, in theory, load this BMP file directly into SimCity 3000, but there's some tweaking you'll likely have to do beforehand.
To continue the process, please continue on to Part II: Prepare & import the terrain (Knowledge Tree article #0167) where we will prep the file for importing into SimCity 3000. This concludes Part I.
See also
 Generating custom terrain from bitmaps
Generating terrain from USGS DEM files
Real terrain importation Part II: Prepare & import terrain
Terrain generation with Photoshop 4.0
Real terrain importation & file edit tips (Macintosh only)
Real terrain creation supplement


There are no comments to display.
Sign In or register to comment...
To comment in reply, you must be a community member
Sign In
Already have an account? Sign in here.
Sign In NowCreate an Account
Sign up to join our friendly community. It's easy!
Register a New Account