


Contributor/author(s): Moose
Confession time: freight railroading fascinates me. I could spend many an hour watching freight yard engineers assembling cuts (strings of cars) for their regular westward run.
Unfortunately, the SimCity series has offered little more than a passing nod to the sandbox railroader. Railroads as implemented in SimCity 3000 are sadly unrealistic. Locomotives start and stop on dimes. The trains can negotiate tight corners with no loss of speed and no risk of derailment. You can build tracks up the steepest of mountains, and climb them (both up and down) with no risk of damage or derailment.
This article will present some basic techniques when laying rail. Many of these techniques are used in creating more advanced features and facilities. These will be covered in later articles.
You will note that there are a number of techniques described in this series that are hard (if not impossible) to accomplish without resorting to the plop cheat. For those who are reluctant to cheat (which is understandable), I'd suggest zoning the appropriate area to contain the buildings you plan to use in order to incur the cost of the zoning, then plopping the desired building onto the zone.
When branches don't grow on trees

As a train normally cannot access a branch track from both directions, the 90 degree T-junction should be avoided when possible. Very close parallel sidings normally cannot avoid the use of the T-junction, even with forcers. More distant sidings or branch tracks can often manage a slick 45 degree branch accessible from only one direction.
A more realistic T-junction can be created by using three interconnected 45 degree switches.

Sometimes when creating a 45 degree corner, the corner is created using a 90 degree corner tile. Click the corner with the lay track icon and it will switch to the 45 degree tile.
Slurping spaghetti, averting messes
One of the more common difficulties involved with transportation as implemented by SC3K is its tendency to connect any nearby road or track. With roads, it creates major traffic tangles. With rail, you get an even more ridiculous sight, trains curling inward on themselves, switching from rail to rail like a hammered engineer.
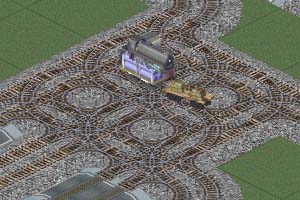
This can be controlled somewhat by the use of Kyle's "road forcer" technique. The technique comes with a visual price however, but one that under normal circumstances can be lived with.
Road forcers: getting back at tailgaters
Rail/Road crossings have a number of interesting properties we can exploit to good effect. Crossings tend to stabilize rail. Nearby tracks are less likely to affect it, and used properly, parallel tracks can be run without forming spaghetti.
It, however, is a mixed blessing because the more forcers in an area, the more likely you have a pedestrian or car crossing the track. A train will stop to let this happen.
I describe it as a mixed blessing because pedestrians on the track can have some useful, if unpredictable effects. These techniques are covered in later articles.

To create a road forcer, you must have room on one side of the track for a road. Drag a road from the side of the track onto the center of the track, then release. Bulldoze the road, leaving the crossing tile intact.

By working from the wide end to the narrow end, one can create a switching yard with as many tracks as are desired.
 Build a useful and beautiful railway system


There are no comments to display.
Sign In or register to comment...
To comment in reply, you must be a community member
Sign In
Already have an account? Sign in here.
Sign In NowCreate an Account
Sign up to join our friendly community. It's easy!
Register a New Account