Tutorial: Changing IIDs for BAT Models Using Reader
A method to make unique instances for BAT models -
This is a tutorial explaining a way to set a new IID instance range using Reader for a given BAT model. I've written this in response to the request @Urban Abstraction made here in the BAT FAQ thread, and posted in case it'll help anyone else looking to do this also.
For the purpose of this explanation, I'll be using the excellent commercial store BAT which Urban created.
(Which is now available to download on the STEX from this file.)
Prerequisites Reader 0.9.3 installed. (Other versions of Reader likely will work too for this method, but I'm using 0.9.3 since it's the most stable and familiar for me.) Basic familiarity of Reader is recommended (as this guide explains), but isn't required as I'll be covering each of the steps to do this. Create a backup of the model file (.SC4Model) to be edited with a new IID allocation. Copy this to some safe place. Step 01 Firstly open the model you'd like to edit: Initially the file entry list will look like this: Step 02 Next we'll sort the Instance column so the ordering is sequential in digit order. Double click this column heading (at the top as I've annotated in orange). As follows: Step 03 Now with the list sorted, it appears logical for what we're going to do next. This step is to generate a random Group and Instance which can be used for setting the unique TGI for the entries. For the Type column and these will be kept as they are which is necessary for certain file entry types. Note: If you have a textures IID range, skip this step and go to Step 04 to set from your allocated range instead.
Go to the Tools menu in Reader and click the TGI Generator option. It'll open up a dialog window: Click the Generate button in the middle, and it'll generate the Group and Instance randomly. Each of these are 8 digit hex values (ranging from 0-9 and A-F). If you're a little fussed about these things like me, then there's no harm in keep clicking the button until there are digits you're happy with using!
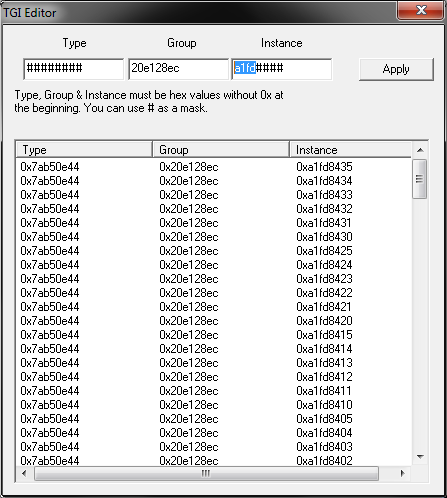
Copy both of these to an empty document. I just used regular Windows Notepad for this, but you can use anything of your preference. They'll be needed for the remaining part of the process to make sure the IIDs are set correctly. Note: For the IID and we only need the first 4 digits, so you can just copy these to your document (e.g. a1fd as I did here) and ignore the other 4 at the end. This is important because of what fits into the following step for preserving the trailing digits. Those are what determine the zooms and rotations, and what the game does is pieces these all together so it knows which texture to display onto the model from different perspectives. Step 04 With this done, go to the Tools menu again in Reader and click the TGI Editor option. This window will open up: In here, for the Group box and I've pasted in the IID which I generated in the prior step. Do this with yours also, and then it gets onto the Instance box as well. Each of the # are placeholder masks, which preserve the values at that particular digit place. By entering in: a1fd#### As this pic highlights with the selection: What this means is to set a1fd for each of the entries. However, to still keep the last 4 digits as they already are. It might even be possible to do this for randomising the initial 5 places in the generation (like a1fde### for example), but I played it safe here and just did it for preserving the final 4 digits at the end. The key thing is how they'll be unique enough as they are. Step 05 The next step is to set apply the Group and Instance to the entries. Reader makes this super easy too. Click the 1st entry listed, then hold down the Shift key and then scroll down to click the bottom one. Then click the button to confirm this. Like so: If not selecting anything, then this error will popup to make it known: Then after closing the TGI Editor (click the X in the corner), the entry list will be updated. Here's how I see it after doing the above:
But, there is one more key part of the process... Step 06 Click the Entry column heading twice as we need to group the S3D files: This makes the next part easier as they're now all listed together.
You'll notice how if clicking one of the S3D file entries, the preview of the model will appear completely white with no texture. Like so: Oh dear. But, don't panic! What the following steps involve is to edit the IIDs so the textures are associated with each of the S3D files. Step 07 With the first S3D file selected, over on the right hand panel are the controls for editing the data. Click the Mats (materials) tab. Then right click the entry and choose the Change Instance/Name option from the context menu. As follows: Step 08 For this part, it only needs the 4 digits from the Instance ID which we've now set using the TGI Editor for the file entries. What this involves here is applying this to the internal reference IID for the S3D files for each sub-instance. The next thing to do is replace the first 4 digits with those as allocated for the main entries. For this I'm using a1fd because it's what came from the random generation:
Doing this for the Name isn't necessary, but I figured it might as well be updated too. Click OK to confirm the change, and then back on the main panel, click the button to save.
This is an essential step, and Reader will throw a warning otherwise: There might be some S3D entries which have more than one. Continue through each of these and update the IDs accordingly the same way. Like so: Step 09 Rinse and repeat the process for all other S3D entries. This took me a few minutes, and it's easy enough to do once getting into the flow of it. When adding each new ID and for these multi-part files you'll see the preview updating with each new piece of the puzzle. Then it's a good idea to go through and do a visual double check that they're each set correctly.
All being well you'll see them all showing up. For example: (Previewing the superb BAT which @Urban Abstraction created. ) Step 10 Finally this isn't necessary in Reader 0.9.3 as it does the re-indexing automatically (other than LotConfig entries, but that's a different thing). But what I did was delete the DIR file and then right click and choose Rebuild Directory File from the context menu. Then click ReIndex too. The DIR file is what contains an index of all compressed entries, and somehow I find this logical to appear at the bottom of the list.
Another little thing I'll mention is how the XML file contains the old Group and Instance still. I went ahead and updated this also, but according to DataNode (which @rivit created as a highly useful tool for diagnosing SC4 file relation conflicts), the XML is ignored and not read by the game. The final (final) step is to Save the file. Yes, it would be completely silly to lose all this work now, wouldn't it? So, click the button and it'll all be done.
(As ever, a special thanks to Cori for helping me with the proofreading.)
Prerequisites Reader 0.9.3 installed. (Other versions of Reader likely will work too for this method, but I'm using 0.9.3 since it's the most stable and familiar for me.) Basic familiarity of Reader is recommended (as this guide explains), but isn't required as I'll be covering each of the steps to do this. Create a backup of the model file (.SC4Model) to be edited with a new IID allocation. Copy this to some safe place. Step 01 Firstly open the model you'd like to edit: Initially the file entry list will look like this: Step 02 Next we'll sort the Instance column so the ordering is sequential in digit order. Double click this column heading (at the top as I've annotated in orange). As follows: Step 03 Now with the list sorted, it appears logical for what we're going to do next. This step is to generate a random Group and Instance which can be used for setting the unique TGI for the entries. For the Type column and these will be kept as they are which is necessary for certain file entry types. Note: If you have a textures IID range, skip this step and go to Step 04 to set from your allocated range instead.
Go to the Tools menu in Reader and click the TGI Generator option. It'll open up a dialog window: Click the Generate button in the middle, and it'll generate the Group and Instance randomly. Each of these are 8 digit hex values (ranging from 0-9 and A-F). If you're a little fussed about these things like me, then there's no harm in keep clicking the button until there are digits you're happy with using!
Copy both of these to an empty document. I just used regular Windows Notepad for this, but you can use anything of your preference. They'll be needed for the remaining part of the process to make sure the IIDs are set correctly. Note: For the IID and we only need the first 4 digits, so you can just copy these to your document (e.g. a1fd as I did here) and ignore the other 4 at the end. This is important because of what fits into the following step for preserving the trailing digits. Those are what determine the zooms and rotations, and what the game does is pieces these all together so it knows which texture to display onto the model from different perspectives. Step 04 With this done, go to the Tools menu again in Reader and click the TGI Editor option. This window will open up: In here, for the Group box and I've pasted in the IID which I generated in the prior step. Do this with yours also, and then it gets onto the Instance box as well. Each of the # are placeholder masks, which preserve the values at that particular digit place. By entering in: a1fd#### As this pic highlights with the selection: What this means is to set a1fd for each of the entries. However, to still keep the last 4 digits as they already are. It might even be possible to do this for randomising the initial 5 places in the generation (like a1fde### for example), but I played it safe here and just did it for preserving the final 4 digits at the end. The key thing is how they'll be unique enough as they are. Step 05 The next step is to set apply the Group and Instance to the entries. Reader makes this super easy too. Click the 1st entry listed, then hold down the Shift key and then scroll down to click the bottom one. Then click the button to confirm this. Like so: If not selecting anything, then this error will popup to make it known: Then after closing the TGI Editor (click the X in the corner), the entry list will be updated. Here's how I see it after doing the above:
But, there is one more key part of the process... Step 06 Click the Entry column heading twice as we need to group the S3D files: This makes the next part easier as they're now all listed together.
You'll notice how if clicking one of the S3D file entries, the preview of the model will appear completely white with no texture. Like so: Oh dear. But, don't panic! What the following steps involve is to edit the IIDs so the textures are associated with each of the S3D files. Step 07 With the first S3D file selected, over on the right hand panel are the controls for editing the data. Click the Mats (materials) tab. Then right click the entry and choose the Change Instance/Name option from the context menu. As follows: Step 08 For this part, it only needs the 4 digits from the Instance ID which we've now set using the TGI Editor for the file entries. What this involves here is applying this to the internal reference IID for the S3D files for each sub-instance. The next thing to do is replace the first 4 digits with those as allocated for the main entries. For this I'm using a1fd because it's what came from the random generation:
Doing this for the Name isn't necessary, but I figured it might as well be updated too. Click OK to confirm the change, and then back on the main panel, click the button to save.
This is an essential step, and Reader will throw a warning otherwise: There might be some S3D entries which have more than one. Continue through each of these and update the IDs accordingly the same way. Like so: Step 09 Rinse and repeat the process for all other S3D entries. This took me a few minutes, and it's easy enough to do once getting into the flow of it. When adding each new ID and for these multi-part files you'll see the preview updating with each new piece of the puzzle. Then it's a good idea to go through and do a visual double check that they're each set correctly.
All being well you'll see them all showing up. For example: (Previewing the superb BAT which @Urban Abstraction created. ) Step 10 Finally this isn't necessary in Reader 0.9.3 as it does the re-indexing automatically (other than LotConfig entries, but that's a different thing). But what I did was delete the DIR file and then right click and choose Rebuild Directory File from the context menu. Then click ReIndex too. The DIR file is what contains an index of all compressed entries, and somehow I find this logical to appear at the bottom of the list.
Another little thing I'll mention is how the XML file contains the old Group and Instance still. I went ahead and updated this also, but according to DataNode (which @rivit created as a highly useful tool for diagnosing SC4 file relation conflicts), the XML is ignored and not read by the game. The final (final) step is to Save the file. Yes, it would be completely silly to lose all this work now, wouldn't it? So, click the button and it'll all be done.
(As ever, a special thanks to Cori for helping me with the proofreading.)

